Note#
This section involves relatively complex operations. If anything is unclear, jump to the companion video tutorial at the end of the article.
Introduction#
In our previous simulation series and MAVROS2 real-hardware articles, we covered simulation environment setup and MAVROS2-based offboard control. Starting from PX4 v1.14, the official recommendation is to use uXRCE-DDS middleware instead of MAVROS as the communication bridge between ROS2 and PX4.
This article takes the Pixhawk 6C (official flight controller) and Nvidia Jetson Orin NX (companion computer) as an example, providing a complete walkthrough of deploying the uXRCE-DDS middleware on real hardware. Topics include:
- uXRCE-DDS architecture (Client/Agent model, DDS Global Data Space)
- PX4 firmware flashing (command-line
make upload+ QGC ground station) - Flight controller serial port parameter configuration and uXRCE-DDS Client activation
- Companion computer WiFi hotspot auto-start configuration
- Agent startup and connectivity testing
- Troubleshooting common issues
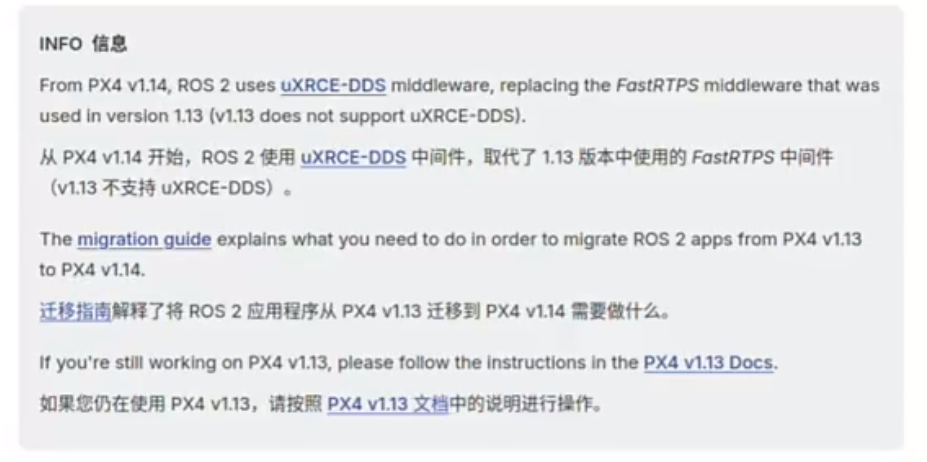
Prerequisites: This article assumes you have completed the simulation environment setup per the ROS2+PX4 Simulation Environment Development Tutorial, and have flashed Ubuntu 22.04 onto your companion computer per ROS2 Hands-On: Flashing the Companion Computer. If this is your first encounter with PX4 on real hardware, we recommend reading Controlling PX4 Drones with a Companion Computer (MAVROS2) first to understand the basic real-hardware workflow.
uXRCE-DDS Architecture#
Why Replace MAVROS with DDS?#
During the ROS1 era and early ROS2 days, MAVROS was the standard solution for connecting ROS with PX4 flight controllers. However, MAVROS is essentially a protocol bridge — it “translates” the MAVLink protocol from the flight controller into ROS topics. This means:
- You must publish/subscribe to topics under the dedicated
/mavrosnamespace (e.g.,/mavros/setpoint_position/local) - A centralized MAVROS node is required to maintain all communication mappings (equivalent to
ROS_Masterin the ROS1 era) - Scalability is limited in multi-drone scenarios
uXRCE-DDS takes a fundamentally different approach. It is built on DDS (Data Distribution Service) — a decentralized real-time data distribution protocol that directly maps PX4’s internal uORB topics to ROS2 topics. The benefits:
- Native ROS2 topics: Sensor data from the flight controller is published directly as standard ROS2 topics, with no MAVROS translation layer. Offboard control code written during simulation can be transferred to real hardware without changing a single topic name.
- Decentralized architecture: All ROS2 nodes automatically discover each other within the same DDS data space — no single point of failure (no ROS1-era Master node).
- Low latency: DDS uses UDP multicast and shared memory for data transmission, with latency far lower than MAVLink serialization overhead.
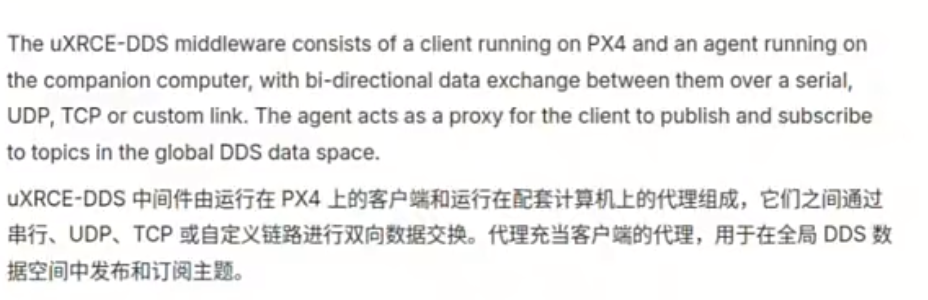
Client/Agent Communication Model#
uXRCE-DDS adopts a Client-Agent architecture:
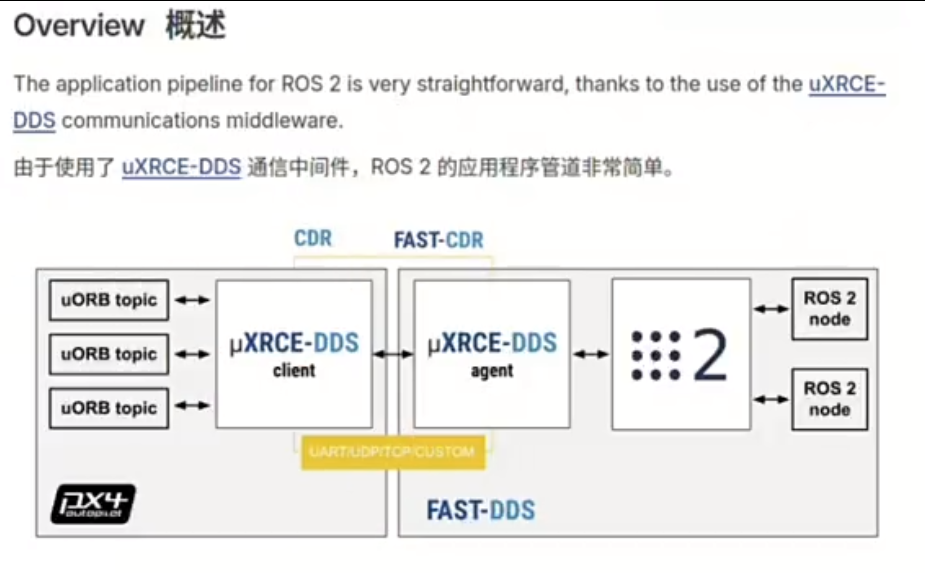
Flight Controller Side (Client): Runs inside PX4, responsible for serializing uORB topic messages into DDS format. It does exactly one thing — bridge the flight controller’s internal uORB messages to the Agent. The Client itself does not participate in DDS discovery or maintain any topology.
Companion Computer Side (Agent): Runs Micro-XRCE-DDS-Agent (the same one we launched with MicroXRCEAgent udp4 -p 8888 during simulation), responsible for:
- Receiving serialized uORB messages from the Client
- Publishing them into ROS2’s DDS Global Data Space
- Receiving ROS2 control commands from the DDS space and forwarding them to the Client
DDS Global Data Space: As long as ROS2 nodes run under the same ROS_DOMAIN_ID, they automatically discover each other’s topics, services, and actions. No manual connection configuration is needed — publishers and subscribers are matched automatically.
The Role of ROS_DOMAIN_ID#
DDS treats all nodes using the same ROS_DOMAIN_ID on the same local network as being “in the same data space.” Check your current domain ID:
echo $ROS_DOMAIN_IDIf the output is empty, the default value is 0. In multi-drone formation scenarios, you can assign different domain IDs to each drone-companion-computer pair for isolated communication. As long as the domain ID is consistent and the nodes are on the same local network, ROS2 nodes discover each other automatically — this is the core advantage of the decentralized architecture.
Hardware Requirements#
Required hardware:
- Pixhawk 6C (or other PX4-native flight controller, firmware version ≥ v1.14)
- Nvidia Jetson Orin NX (or other companion computer, running Ubuntu 22.04)
- USB-TypeC cable (connect flight controller to local computer for flashing and parameter configuration)
- Dupont wires ×3 (connect flight controller TELEM2 to companion computer UART)
- Companion computer power cable (12V)
- Flight controller battery
- Telemetry radio module (for ground station; optional but strongly recommended)
Firmware version requirement: The uXRCE-DDS middleware is only included in PX4 source code v1.14 and above. The latest stable version has reached v1.16 (v1.17 appeared as of July 2026); we recommend using the latest version.
Flashing PX4 Firmware#
Ensure the flight controller firmware version is ≥ v1.14. If your existing firmware meets this requirement, you may skip this section. Otherwise, choose one of the two methods below to re-flash.
Method 1: Command-Line Build & Upload (Recommended)#
Clone the PX4 source and compile + upload. This method suits readers who already have a PX4 development environment set up.
cd ~/PX4-AutopilotBefore flashing, confirm the board target for your flight controller. The target for Pixhawk 6C is px4_fmu-v6c:
# List all available build targets
make list_config_targets | grep -i "v6c"After confirming the flight controller is connected to your computer via USB-TypeC, check the serial port:
ls -l /dev/ttyACM*
# Should output something like /dev/ttyACM0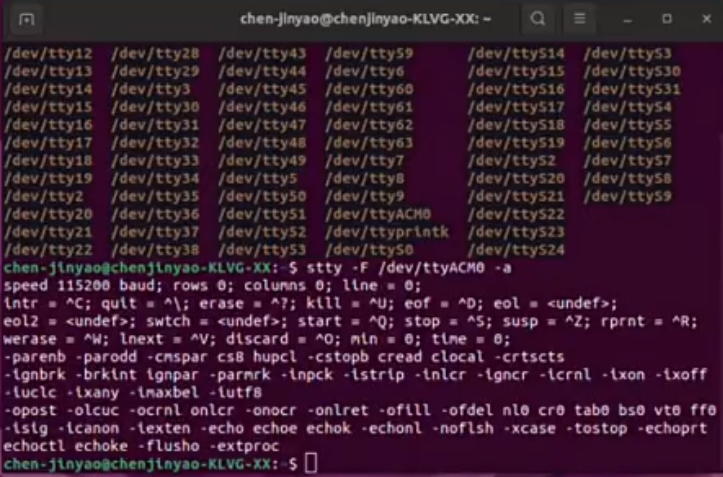
Use make upload to compile and flash in one step:
make px4_fmu-v6c upload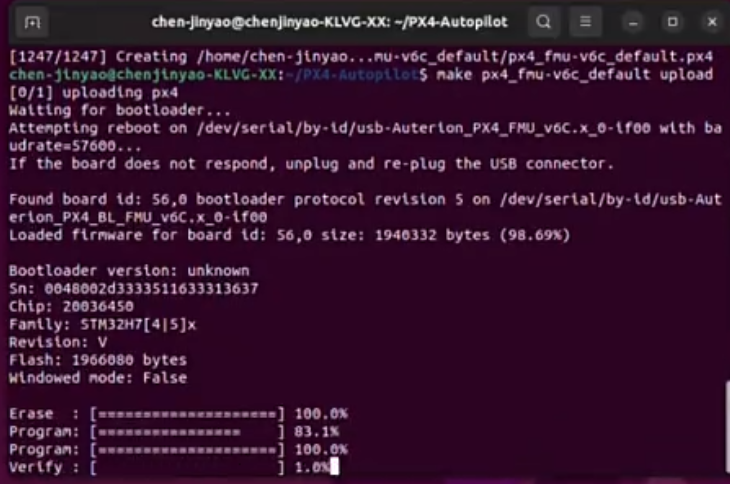
The terminal will show build progress. After completion, the flight controller reboots automatically. You can verify a successful flash by checking the NSH (NuttShell) messages:
# Check serial port settings; confirm baud rate is 115200
stty -F /dev/ttyACM0 115200 raw -echo
cat /dev/ttyACM0
# Press Enter; seeing the nsh> prompt means the flight controller is running normallyCommon issue: If
make uploadreports a permission error, runsudo usermod -a -G dialout $USERand log in again.
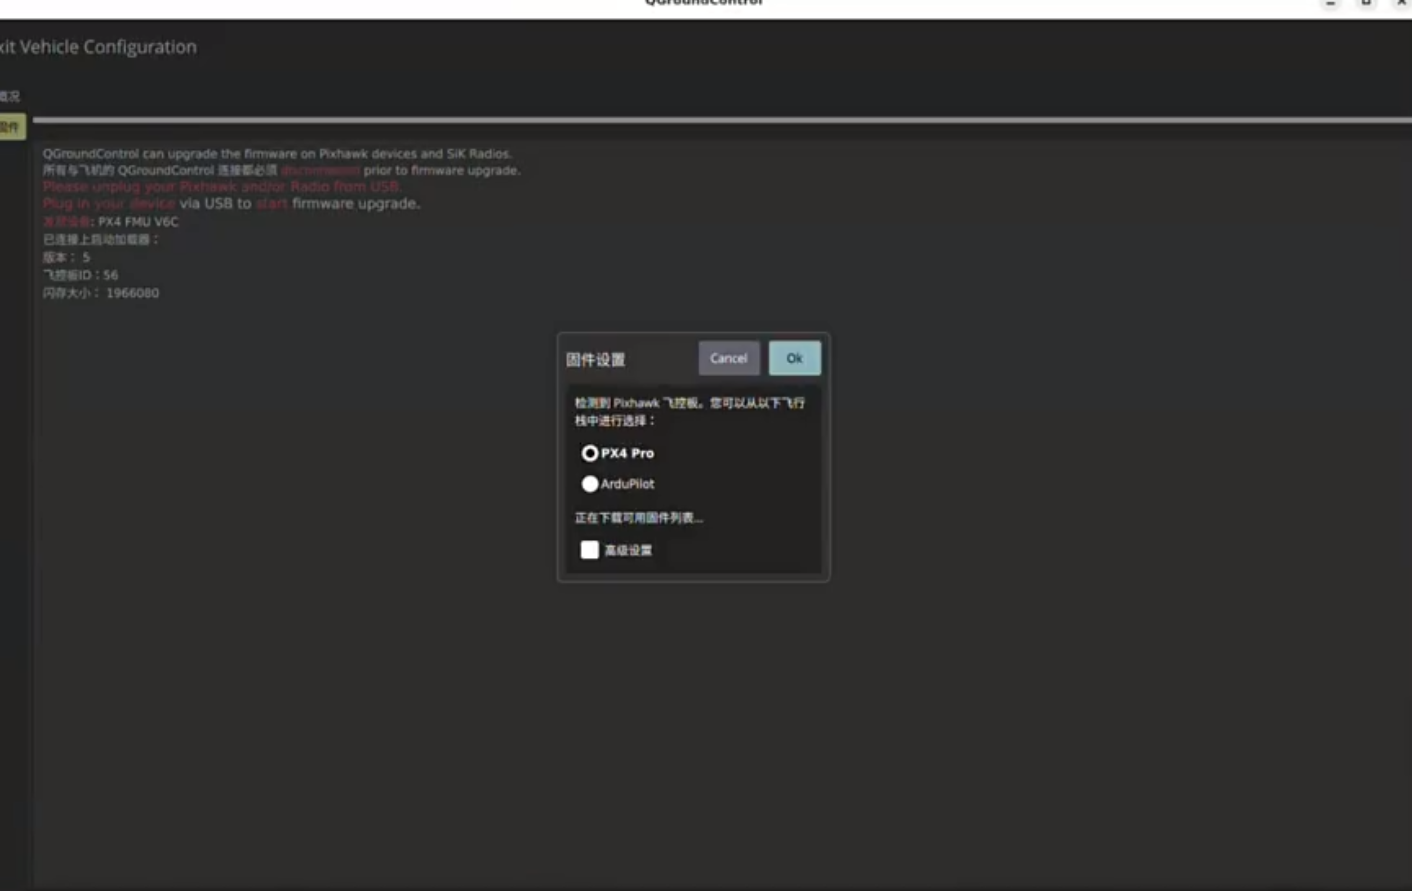
Method 2: QGroundControl Ground Station Flashing#
If you prefer not to compile from the command line, you can flash a pre-built firmware directly using QGC.
- Open QGroundControl and connect the flight controller via USB
- Go to “Vehicle Setup” → “Firmware”
- Unplug the USB and plug it back in; QGC will automatically detect the flight controller model
- Confirm the displayed version is ≥ v1.14, then click “OK” to start flashing
- Wait for the progress bar to complete
Note: Ground station flashing resets all parameters. Export a backup first if you have previously configured parameters.
Flight Controller Serial Port Parameter Configuration#
This section is the most error-prone part of the deployment — we need to accurately understand the flight controller’s internal serial port naming and mapping.
Serial Port Mapping#
The Pixhawk 6C has three TELEM ports, each corresponding to a different TTY device internally:
| Physical Port | Internal TTY | Default Use | Default Baud Rate |
|---|---|---|---|
| TELEM1 | /dev/ttyS5 | Telemetry (MAVLink) | 57600 |
| TELEM2 | /dev/ttyS3 | Companion Computer | 921600 |
| TELEM3 | /dev/ttyS0 | Spare | — |
This article uses TELEM2 to connect to the companion computer. The TELEM2 6-pin layout is: VCC (5V), TX, RX, PWM, GPIO, GND. We only need three wires:
| TELEM2 Pin | Connects To | Jetson Orin NX UART2 Pin |
|---|---|---|
| TX | → | Pin 10 (RX) |
| RX | → | Pin 8 (TX) |
| GND | → | Pin 6 (GND) |
Do NOT connect VCC! The flight controller and companion computer each have independent power supplies.
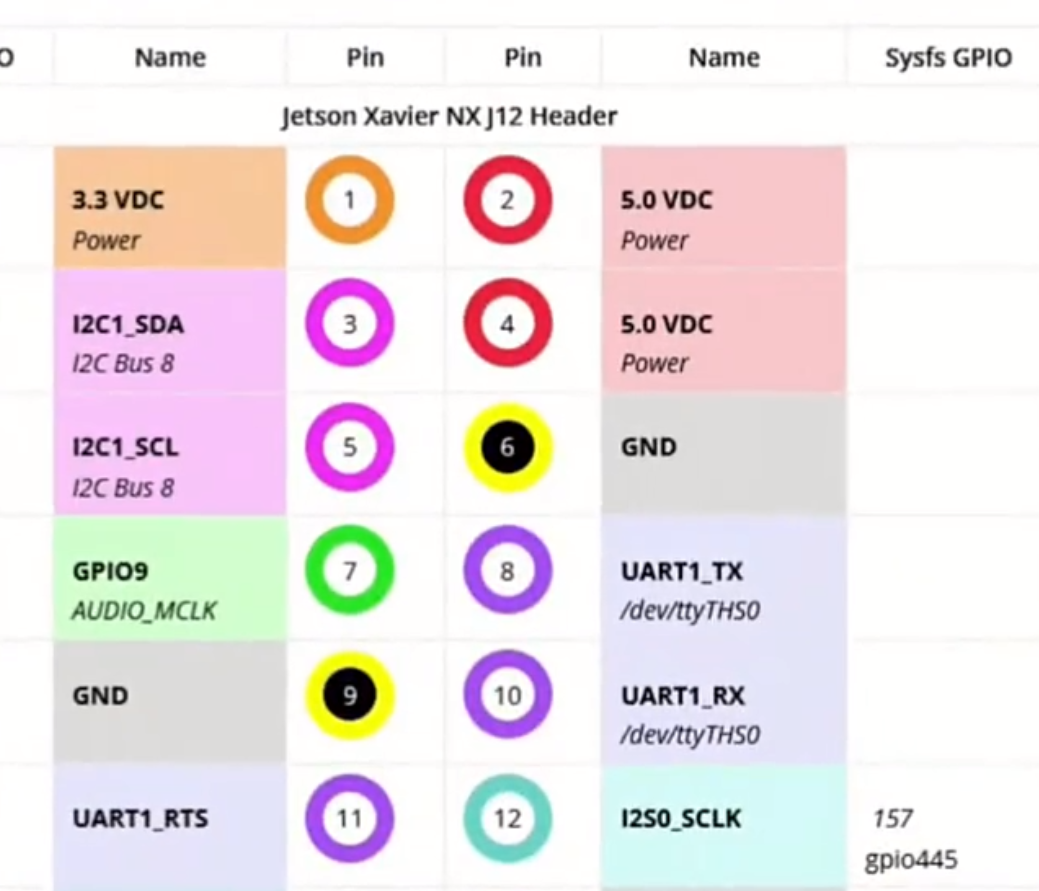
Different companion computers have different UART pinouts and TTY device names. For the Jetson Orin NX:
| UART | TX Pin | RX Pin | GND Pin | TTY Device |
|---|---|---|---|---|
| UART1 (default debug console) | Pin 8 | Pin 10 | Pin 6 | /dev/ttyTHS0 |
| UART2 | Pin 12 | Pin 14 | Pin 6 | /dev/ttyTHS1 |
We use UART2 (/dev/ttyTHS1) in this article, reserving UART1 as the debug console. Please consult the pinout diagram for your specific companion computer model.
Entering the Flight Controller Terminal via NSH#
With the flight controller connected to your local computer via USB, use the mavlink_shell tool to enter the NSH terminal:
cd ~/PX4-Autopilot
./Tools/mavlink_shell.py /dev/ttyACM0:9600Note: The baud rate for entering NSH is 9600 (not 115200 nor 921600). If QGC has occupied the serial port, close the ground station first.
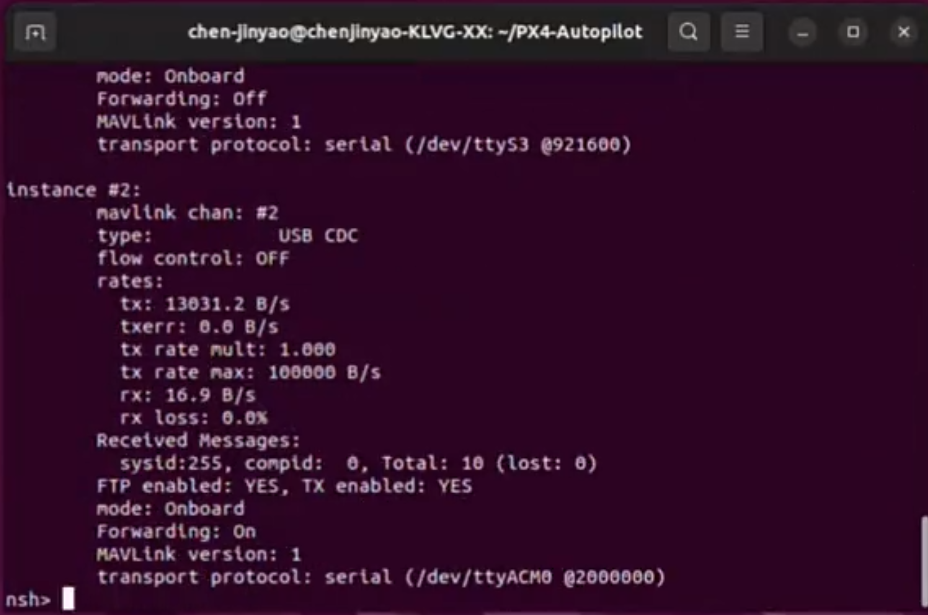
After entering, you should see the nsh> prompt. First, check the current MAVLink instance allocation with mavlink status:
nsh> mavlink status
instance #0:
    TX queue: ...
    ...
    UART: /dev/ttyS5, 57600 baud    ← TELEM1 (Telemetry)
instance #1:
    ...
    UART: /dev/ttyS3, 921600 baud   ← TELEM2 (Companion Computer)
instance #2:
    ...
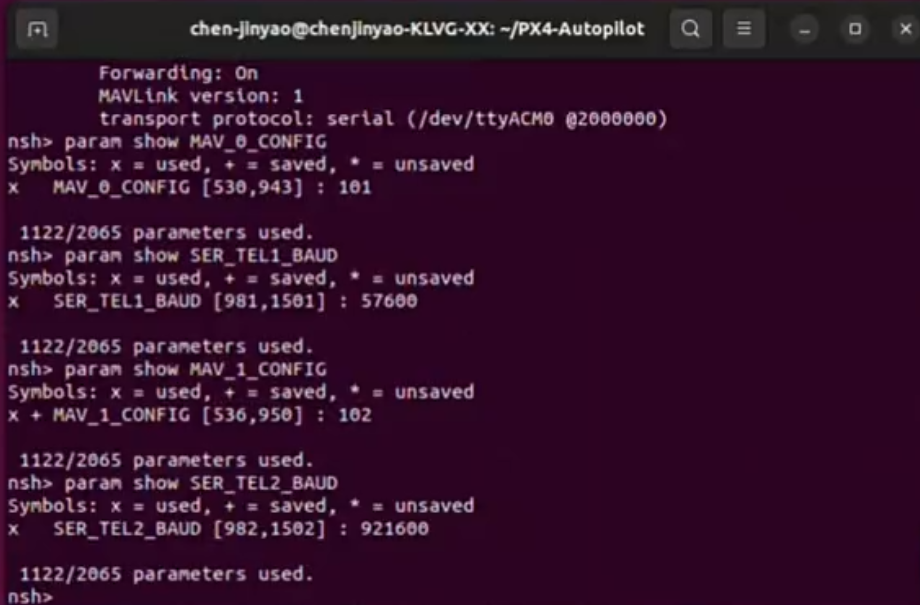
UART: /dev/ttyACM0, 9600 baud ← USB (Current Connection)You can see the flight controller has automatically assigned MAVLink instance #1 to TELEM2 at 921600 baud. However, we need TELEM2 to carry uXRCE-DDS instead of MAVLink, otherwise the two will conflict.
Disabling the MAVLink Instance on TELEM2#
Check the current MAVLink parameter configuration:
nsh> param show MAV_1_CONFIG
MAV_1_CONFIG = 102    ← 102 corresponds to TELEM2

nsh> param show MAV_1_MODE
MAV_1_MODE = 0 ← 0 = Normal (MAVLink)The parameter value 102 is the hardware port identifier for TELEM2. We need to:
- Set
MAV_1_CONFIGto 0 (disable this MAVLink instance) - Stop the currently running MAVLink instance on TELEM2 (ttyS3)
# 1. Disable MAVLink on TELEM2
param set MAV_1_CONFIG 0

# 2. Stop the running MAVLink instance on ttyS3
mavlink stop -d /dev/ttyS3Check mavlink status again — only two instances should remain (TELEM1 + USB), with TELEM2’s MAVLink now stopped.
Enabling the uXRCE-DDS Client#
Now start the uXRCE-DDS Client on TELEM2:
nsh> uxrce_dds_client start -d /dev/ttyS3 -b 921600Parameter explanation:
-d /dev/ttyS3: Specifies the serial device corresponding to TELEM2-b 921600: Baud rate; must match MAV_1_RATE
Optional namespace parameter: Adding
-n <namespace>prefixes all published topics with a namespace (e.g.,/px4_1/fmu/...). This is very useful in multi-drone scenarios to distinguish between different flight controller instances. Single-drone setups can omit this.
Set the DDS configuration parameter to ensure the DDS Client binds to the correct port:
nsh> param set UXRCE_DDS_CFG 102Why 102? This parameter specifies which hardware port the uXRCE-DDS Client should bind to. 102 = TELEM2 (the same port as MAV_1_CONFIG=102). The default value is 0 (unconfigured); it must be set explicitly.
Verify the Client is running:
nsh> uxrce_dds_client status
# Output should show "running" status, but not yet connected to the Agent ("not connected" is normal at this stage)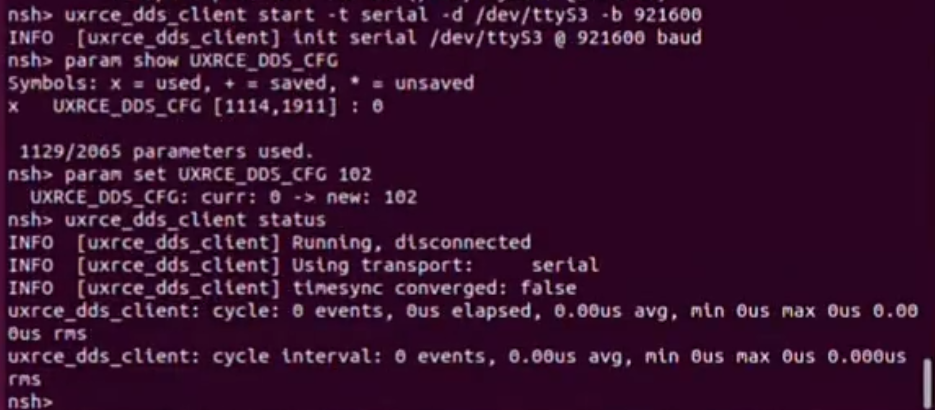
The flight controller configuration is now complete. To recap the key commands:
# Complete command sequence executed in the flight controller NSH
param set MAV_1_CONFIG 0                                             # Disable MAVLink on TELEM2
mavlink stop -d /dev/ttyS3                                           # Stop the existing MAVLink instance
uxrce_dds_client start -d /dev/ttyS3 -b 921600                       # Start uXRCE-DDS Client
param set UXRCE_DDS_CFG 102                                          # Bind DDS to TELEM2
uxrce_dds_client status # Verify statusHardware Wiring#
Connect the TELEM2 TX, RX, and GND pins from the flight controller to the corresponding UART2 pins on the companion computer:
| TELEM2 Pin | Connects To | Jetson Orin NX UART2 Pin |
|---|---|---|
| TX | → | Pin 10 (RX) |
| RX | → | Pin 8 (TX) |
| GND | → | Pin 6 (GND) |
If you are using a USB-TTL adapter (similar to Method 1 in the MAVROS article), the companion computer side will use /dev/ttyUSB0. The following steps use a direct UART connection (/dev/ttyTHS1) as the example.
Companion Computer WiFi Hotspot Configuration#
During actual flights, we cannot connect a monitor, keyboard, and mouse to the companion computer — all operations must be performed remotely via SSH. This requires the companion computer and your local computer to be on the same local network. The most reliable approach is to have the companion computer create its own WiFi hotspot, which your local computer connects to, enabling SSH via a fixed IP address.
Creating the Hotspot#
Open a terminal on the companion computer (Jetson Orin NX):
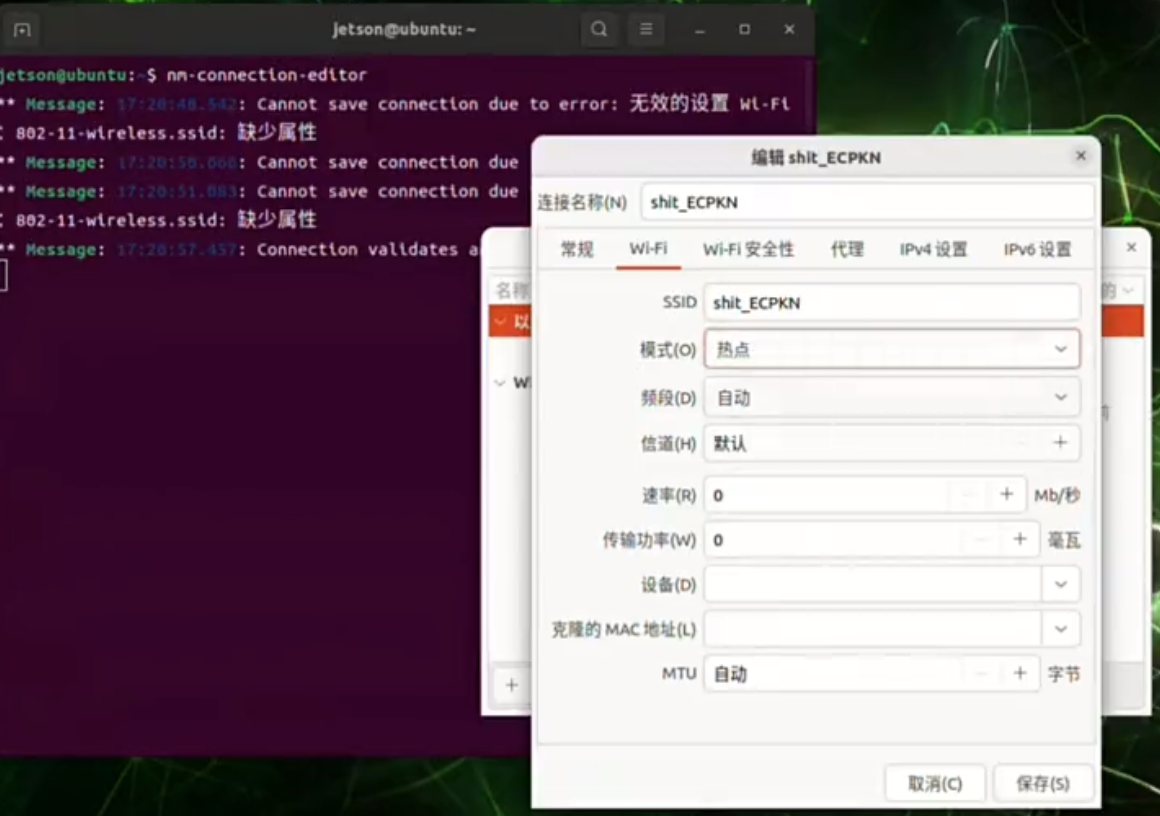
nm-connection-editorIn the GUI that appears:
- Click ”+” → choose “Wi-Fi” → click “Create”
- Connection name: choose any name, e.g.,
drone-hotspot - SSID: same as the connection name
- Mode: select Hotspot
- Wi-Fi Security: choose “WPA & WPA2 Personal”, set a password of at least 8 characters
- Switch to the IPv4 Settings tab, set Method to “Manual”:
- Address:
192.168.10.1 - Netmask:
24 - Gateway:
192.168.10.1
- Address:
- IPv6 Settings: set Method to “Ignore”
- Click “Save”
Setting the Hotspot to Auto-Start on Boot#
First, delete previously saved WiFi connections (to prevent the companion computer from connecting to old WiFi networks on power-up):
# List all saved connections
nmcli connection show

# Delete unwanted connections (keep the hotspot you just created)
sudo nmcli connection delete "<old WiFi name>"Set the hotspot to auto-connect:
nmcli connection modify "drone-hotspot" connection.autoconnect yes
nmcli connection modify "drone-hotspot" connection.autoconnect-priority 10Activate the hotspot:
nmcli connection up "drone-hotspot"Now, on your local computer, search for WiFi networks — you should see the drone-hotspot signal. After connecting, verify:
ping 192.168.10.1From now on, each time: power the flight controller → power the companion computer → hotspot starts automatically → connect from local computer → SSH:
ssh jetson@192.168.10.1Starting the Agent and Connectivity Testing#
Pre-Connection Checks#
After SSH-ing into the companion computer, do not power the flight controller yet. Perform the following preparation steps:
# 1. Add your user to the dialout group (prevents serial port permission issues)
sudo usermod -a -G dialout $USER
# Log out and back in for this to take effect

# 2. Check available serial devices
ls -l /dev/ttyTHS*
# Should output /dev/ttyTHS1 (UART2)Confirm that Micro-XRCE-DDS-Agent is installed on the companion computer (it should already be present from your simulation environment; if not, refer to the MicroXRCE-DDS Agent installation section in the ROS2+PX4 Simulation Tutorial).
Verifying Hardware Connectivity#
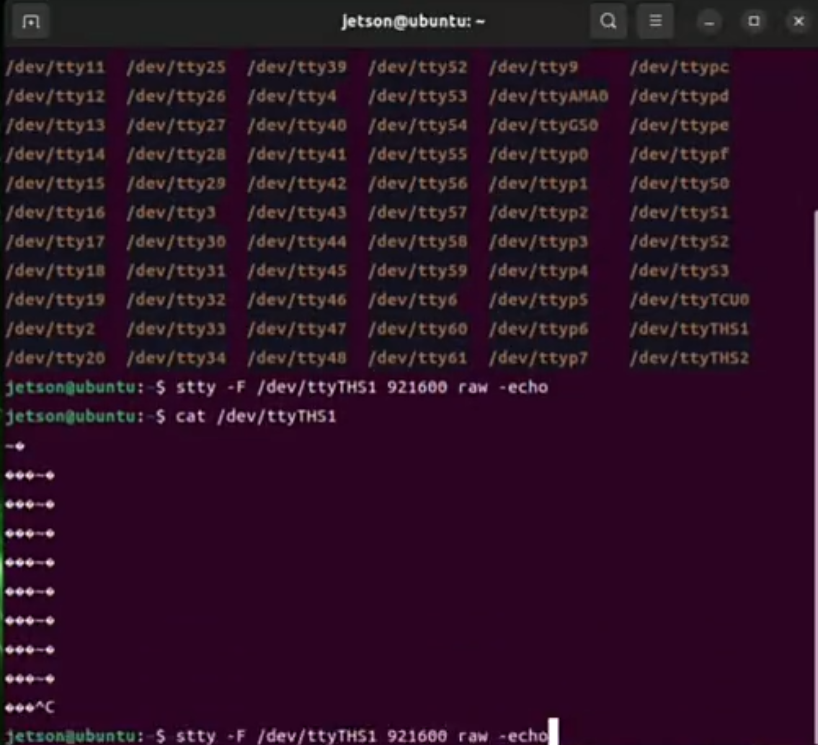
First, test whether the flight controller → companion computer serial communication is working. After powering the flight controller, use cat to check for a data stream:
stty -F /dev/ttyTHS1 921600 raw -echo
cat /dev/ttyTHS1If you see garbled output (MAVLink or uXRCE-DDS binary data), the physical connection and serial port configuration are correct:
If there is no output, check:
- Whether the flight controller TELEM2 TX ↔ companion computer UART RX are correctly cross-connected
- Whether the baud rates match (both the flight controller and companion computer should use 921600)
- Whether
uxrce_dds_client starthas been executed on the flight controller - Whether another process (e.g., ground station) is occupying the serial port
Starting Micro-XRCE-DDS-Agent#
# Activate the ROS2 environment
source /opt/ros/humble/setup.bash

# Start the Agent, connecting to the flight controller via the serial port
MicroXRCEAgent serial --dev /dev/ttyTHS1 -b 921600On a successful connection, the terminal will output something like:
[info] Serial agent starting...
[info] Connect to serial device: /dev/ttyTHS1, baudrate: 921600
[info] Connection established
[info] Client connected: 0x00000001
[info] Topic created: /fmu/out/vehicle_odometry
[info] Topic created: /fmu/out/imu
[info] Topic created: /fmu/out/...
...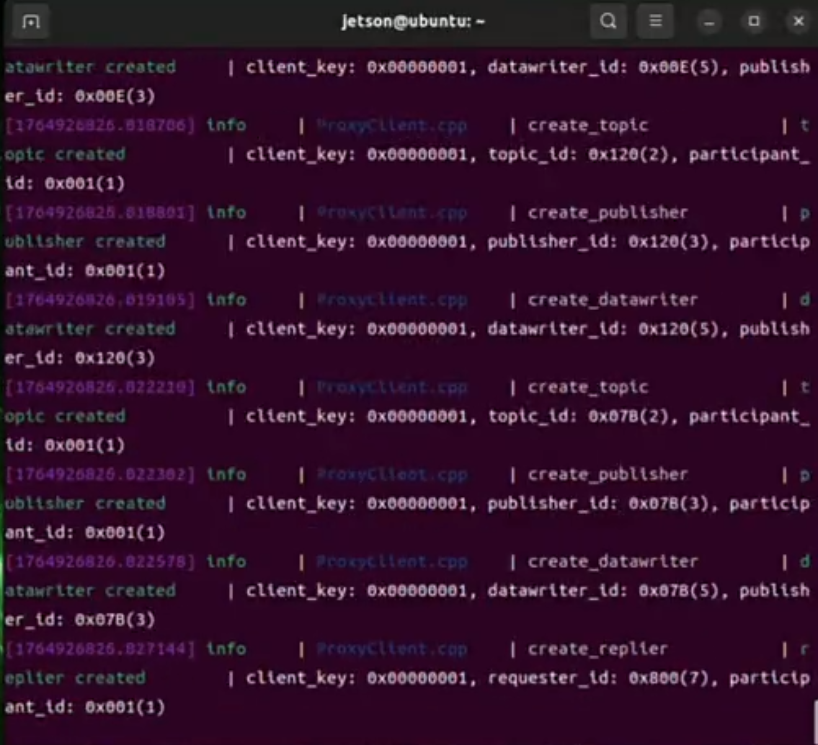
The uXRCE-DDS middleware deployment is now complete. The Agent will automatically publish the flight controller’s uORB topics as ROS2 topics. Verify in another terminal:
source /opt/ros/humble/setup.bash
ros2 topic list | grep fmuYou should see a large number of topics prefixed with /fmu/out/... carrying flight controller data. Your ROS2 offboard control code can now run directly on the companion computer, with topic names identical to those used in the simulation environment!
Complete Startup Sequence#
Before each real flight, follow this sequence:
- Connect your local computer to the companion computer’s hotspot
drone-hotspot - Confirm you can ping
192.168.10.1 - Power the flight controller (via battery) and wait for it to finish booting
- Confirm the ground station (QGC) is connected to the flight controller via telemetry
- SSH into the companion computer:
ssh jetson@192.168.10.1 - In the SSH terminal, start the Agent:
source /opt/ros/humble/setup.bash
MicroXRCEAgent serial --dev /dev/ttyTHS1 -b 921600- Open a second SSH terminal and run the ROS2 control node:
source /opt/ros/humble/setup.bash
source ~/ros2_ws/install/setup.bash
ros2 run offboard_control simple_offboard # Using the earlier Offboard node as an exampleImportant tip: Based on experience, once the Agent establishes a successful connection, try to keep the flight controller powered and connected. Repeatedly disconnecting and reconnecting the serial port mid-flight sometimes causes subsequent connection failures. It is recommended to connect once when everything is ready and avoid changes in between.
Parameter Quick Reference#
| Parameter | Value | Description |
|---|---|---|
MAV_1_CONFIG | 0 (disabled) | Decommission MAVLink on TELEM2 |
MAV_2_CONFIG | 101 (TELEM1) | Keep telemetry on TELEM1 |
UXRCE_DDS_CFG | 102 (TELEM2) | Bind DDS Client to TELEM2 |
SER_TEL2_BAUD | 921600 | TELEM2 baud rate |
uXRCE-DDS vs. MAVROS Comparison#
| uXRCE-DDS | MAVROS | |
|---|---|---|
| PX4 Recommendation | Recommended since v1.14+ | Legacy, still maintained |
| Topic Naming | Native ROS2 topics | /mavros/ namespace |
| Architecture | Decentralized DDS | Centralized bridge |
| Multi-Drone Scaling | DDS auto-discovery | Manual configuration required |
| Sim-to-Real Code Reuse | Identical topics; no code changes needed | Topic prefix substitution required |
| Stability | Under active development | Mature and stable (from ROS1 era) |
| Real-Hardware Latency | Low (UDP multicast) | Moderate (MAVLink serialization) |
Recommendation: Prefer uXRCE-DDS for new projects. If your flight controller firmware version is < v1.14 and cannot be upgraded, or if you have a large body of legacy MAVROS code that needs compatibility, MAVROS remains a viable choice. See Controlling PX4 Drones with a Companion Computer (MAVROS2).
Troubleshooting Common Issues#
| Symptom | Likely Cause | Troubleshooting |
|---|---|---|
| NSH terminal unreachable; serial port occupied | QGC or another process has occupied ACM0 | Close QGC ground station and retry |
uxrce_dds_client start reports an error | Baud rate mismatch or TELEM2 still in use by MAVLink | Confirm MAV_1_CONFIG=0 and that mavlink stop -d /dev/ttyS3 has been executed |
| Agent always shows “not connected” after startup | UXRCE_DDS_CFG not correctly set | param set UXRCE_DDS_CFG 102 |
| cat /dev/ttyTHS1 produces no output | Wiring error or baud rate mismatch | Check TX/RX cross-connection and that the baud rate is 921600 |
Agent is connected but ros2 topic list shows no /fmu/ topics | ROS2 environment not sourced, or domain ID mismatch | source /opt/ros/humble/setup.bash, check echo $ROS_DOMAIN_ID |
| Serial device is not named ttyTHS1 | A different UART is in use | ls /dev/ttyTHS* to list available devices |
Summary#
This article provided a complete walkthrough of deploying the uXRCE-DDS middleware on a Pixhawk 6C + Jetson Orin NX setup — covering firmware flashing, flight controller NSH terminal operations, MAVLink decommissioning and DDS Client activation, hardware wiring, companion computer hotspot configuration, and Agent startup. As the PX4-recommended ROS2 communication solution, uXRCE-DDS offers significant advantages in code portability (simulation code works directly on real hardware), scalability (automatic DDS discovery), and latency.
That said, MAVROS, as a time-tested solution, still holds value in terms of stability and community documentation. Readers can choose flexibly based on their flight controller firmware version and project requirements. If you experiment with both approaches and compare their performance, we welcome you to share your experience in the comments.
Thank you for reading! Corrections and feedback are always appreciated.
Companion Video Tutorial#
If the video below loads slowly, watch it on Zhihu: https://www.zhihu.com/zvideo/1981084557504701099 ↗
References#
- PX4 Official Docs — uXRCE-DDS (PX4-ROS2/DDS Bridge) ↗
- PX4 Official Docs — ROS 2 User Guide ↗
- eProsima Micro-XRCE-DDS Official Docs ↗
- ROS2+PX4 Simulation Tutorial — MicroXRCE-DDS Agent Installation
- Controlling PX4 Drones with a Companion Computer (MAVROS2)
- ROS2 Hands-On: Flashing the Companion Computer