Introduction#
In the third part of our drone formation simulation series, we focus on integrating object detection into the ROS2+PX4 simulation environment using YOLOv8 for efficient real-time detection. YOLO (You Only Look Once) is a high-performance real-time object detection algorithm widely used in computer vision tasks such as drone target recognition, autonomous driving, and surveillance.
We use PX4 SITL (Software-In-The-Loop) with Gazebo Ignition and the gz_x500_depth quadrotor model. The system subscribes to the RGB camera (OakD-Lite) feed, applies YOLOv8 for target detection, and visualizes results in real-time on Ubuntu 22.04. This provides a foundation for more advanced cooperative drone tasks.
Creating a Python Virtual Environment#
This setup uses Python 3.10.12 — adjust commands for your Python version as needed.
# Create virtual environment
python3 -m venv ~/px4-venv
# Activate
source ~/px4-venv/bin/activate
# Link ROS2 environment
source /opt/ros/humble/setup.bash
export PYTHONPATH=/opt/ros/humble/lib/python3.10/site-packages:$PYTHONPATHInstalling MAVSDK#
If you encounter NumPy version conflicts, uninstall the current version with pip uninstall numpy -y first, then install NumPy 1.x as shown below.
pip install mavsdk
pip install aioconsole
pip install pygame
sudo apt install ros-humble-ros-gzgarden
pip install "numpy<2"
pip install opencv-pythonInstalling YOLO#
pip install ultralyticsLaunching the Quadrotor with Camera and Adding Camera Topics#
We modify the launch command slightly from the previous articles:
PX4_GZ_STANDALONE=1 PX4_SYS_AUTOSTART=4001 PX4_GZ_MODEL_POSE="0,0" PX4_SIM_MODEL=gz_x500_depth ./build/px4_sitl_default/bin/px4 -i 0For the x500 model, 4001/4002 correspond to two different quadrotor configurations (“X” frame and cross frame). Here we use the gz_x500_depth model with a depth camera, which differs from the previous setup.
Now let’s examine the model.sdf file for x500_depth and its camera module OakD_Lite:
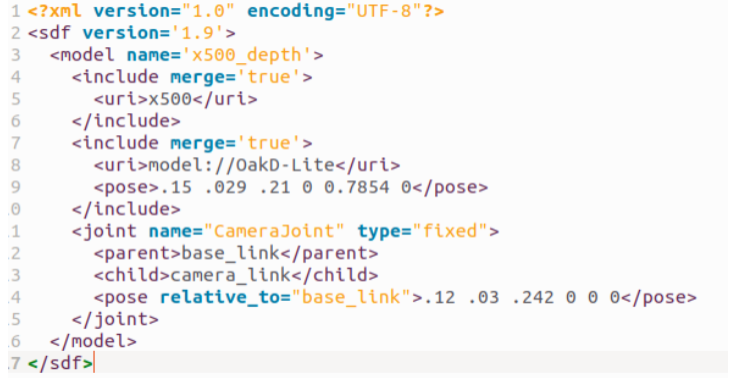
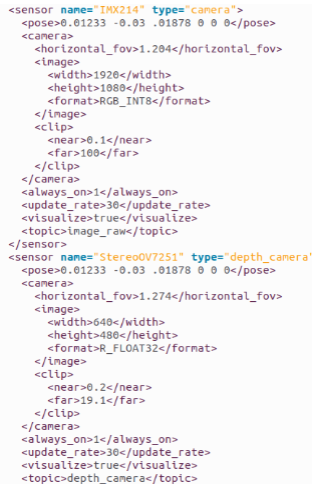
The OakD-Lite camera module has two camera sensors: the IMX214 (RGB camera) and the StereoOV7251 (depth camera). The RGB camera outputs RGB_INT8 format, while the depth camera outputs R_FLOAT32 format. RGB cameras are commonly used for image recognition, while depth cameras measure distance and are useful for obstacle avoidance. Here, we’ll use the RGB camera first.
Key parameters from the SDF file:
<width>1920</width>
<height>1080</height>
<format>RGB_INT8</format>These three parameters represent image dimensions and format — critical for the code that follows. RGB_INT8 is a three-channel format.
<always_on>1</always_on>
<update_rate>30</update_rate>
<visualize>true</visualize>
<topic>image_raw</topic><always_on> keeps the camera continuously active. The camera has a ROS2 topic named image_raw (added manually here), which we’ll use for message transport.
Running YOLOv8 Object Detection#
mkdir -p ~/YOLO
cd ~/YOLO
touch uav_camera_det.pyCreate a /YOLO directory and write a Python script for YOLOv8 object detection:
import rclpy
from rclpy.node import Node
from sensor_msgs.msg import Image
from cv_bridge import CvBridge
import cv2
from ultralytics import YOLO

model = YOLO('yolov8m.pt')Import the required libraries and image conversion tools. rclpy is the ROS2 Python client library, CvBridge converts between ROS and OpenCV image formats, and yolov8m.pt is the medium-sized model trained on the COCO dataset (80 object classes).
COCO dataset categories:
0: person         1: bicycle       2: car           3: motorcycle
4: airplane       5: bus           6: train         7: truck
8: boat           9: traffic light 10: fire hydrant 11: stop sign
...
76: scissors 77: teddy bear 78: hair drier 79: toothbrushTo reduce computation and improve detection speed, we can limit the target classes — more on that below.
class ImageSubscriber(Node):
    def __init__(self):
        super().__init__('image_subscriber')
        self.subscription = self.create_subscription(
            Image,
            '/image_raw',
            self.listener_callback,
            10)
        self.br = CvBridge()
        self.frame_count = 0
        self.process_interval = 1

        cv2.namedWindow('YOLOv8 Detection', cv2.WINDOW_NORMAL)
cv2.resizeWindow('YOLOv8 Detection', 640, 480)Similar to the C++ Offboard code in the previous article, we define a new class image_subscriber as a ROS2 subscriber instance. The topic name must match the one we added to the RGB camera’s SDF file: /image_raw. CvBridge converts ROS image format (RGB8) to OpenCV format (BGR8). The display window is set to 640×480.
def listener_callback(self, data):
    self.frame_count += 1
    if self.frame_count % self.process_interval != 0:
        self.get_logger().info("Skipping frame")
        return
    try:
        self.get_logger().info(f"Received frame, encoding: {data.encoding}")
        image = self.br.imgmsg_to_cv2(data, desired_encoding="bgr8")
        self.get_logger().info(f"Image shape: {image.shape}")
        image = cv2.resize(image, (640, 480))
        cv2.imwrite("input_image.jpg", image)
        results = model.predict(image, classes=[0, 2])
        annotated_image = results[0].plot()
        cv2.imwrite("yolo_output.jpg", annotated_image)
        cv2.imshow('YOLOv8 Detection', annotated_image)

        if cv2.waitKey(1) & 0xFF == ord('q'):
            raise KeyboardInterrupt
        self.get_logger().info(f"Detected {len(results[0].boxes)} objects")
        for box in results[0].boxes:
            self.get_logger().info(f"Detected: class={box.cls}, conf={box.conf}, bbox={box.xyxy}")
    except Exception as e:
self.get_logger().error(f"Image processing error: {str(e)}")The callback function: cv2.resize(image, (640, 480)) preprocesses the 1920×1080 image from the SDF config down to 640×480. results = model.predict(image, classes=[0, 2]) runs YOLOv8 with detection limited to classes 0 and 2 (person, car) for faster performance. To detect all 80 classes, use results = model.predict(image) without the classes parameter — though this is computationally expensive.
def destroy_node(self):
    cv2.destroyAllWindows()
super().destroy_node()Override the node cleanup method to close OpenCV windows and clean up ROS2 resources.
def main(args=None):
    rclpy.init(args=args)
    image_subscriber = ImageSubscriber()
    try:
        rclpy.spin(image_subscriber)
    except KeyboardInterrupt:
        pass
    finally:
        image_subscriber.destroy_node()
        rclpy.shutdown()

if __name__ == '__main__':
main()The main() function initializes the ROS2 environment, spins the subscriber node, and cleans up on exit.
Running the Simulation#
# Terminal 1
python3 simulation-gazebo

# Terminal 2
cd ~/PX4-Autopilot
PX4_GZ_STANDALONE=1 PX4_SYS_AUTOSTART=4001 PX4_GZ_MODEL_POSE="0,0" PX4_SIM_MODEL=gz_x500_depth ./build/px4_sitl_default/bin/px4 -i 0

# Terminal 3
MicroXRCEAgent udp4 -p 8888Start Gazebo, the depth-camera quadrotor, and communication as before. Then run the ROS2-Gazebo bridge:
ros2 run ros_gz_image image_bridge /image_rawThis bridges Gazebo’s camera topics to ROS2 sensor_msgs.msg.Image messages, publishing to the /image_raw topic we configured in the SDF file.
Now run YOLOv8 detection and Offboard control:
# Terminal 1 — Activate virtual environment and run YOLO
source ~/px4-venv/bin/activate
cd ~/YOLO
python3 uav_camera_det.py

# Terminal 2 — Run Offboard control
ros2 run multioffboardcontrol uav0_1Results#
Video 1: YOLO detection successfully running in simulation
The depth-camera quadrotor starts successfully and YOLOv8 detection is active. Since no vehicles or people were placed in the simulation world, no targets are detected — users can add objects to verify detection.
Note that since the camera is rigidly attached to the drone’s body frame and the Offboard control uses circular motion, the camera rotates with the drone, causing unstable imagery. Using level flight with adjustable camera gimbal would improve detection stability.
Summary#
In this article, we integrated YOLOv8 for object detection in the ROS2+PX4 simulation environment. Key points include understanding the difference between RGB and depth cameras, ensuring the SDF file has the required topic configuration (add it manually if not), and considerations for practical improvements such as compensating for body-frame camera rotation and improving detection accuracy.
With both RGB and depth cameras available, the quadrotor can perform object detection, autonomous obstacle avoidance, and more. To integrate visual perception into multi-drone formations, see the earlier ROS2+PX4 Multi-Drone Offboard Control guide — we look forward to seeing your applications.
Thank you for reading. Feedback, corrections, and suggestions are always welcome.